
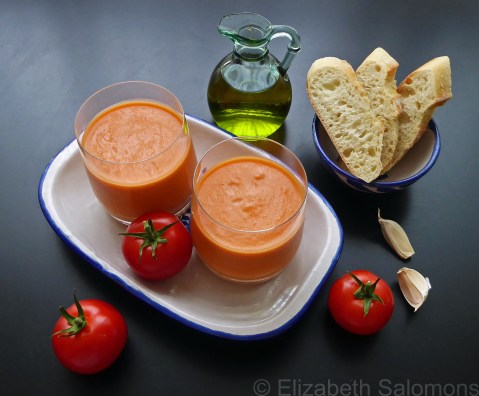
Recipe Box: Gazpacho
In my tour through Spain these past almost eleven (!!) months, I haven’t been talking about the food. That’s been rather intentional — there were so many memorable meals I could have written about that it would have taken me off on another tangent altogether.
Those meals were so memorable that I made sure to pick up a couple of cookbooks to take home with me. One is filled with recipes of typical Spanish dishes and the other contains only tapas recipes. (Both are published in English — let’s just make that perfectly clear!) But when it came down to deciding which recipe, of all the Spanish dishes I like to re-create in my own kitchen, to write about here — well, that was a near impossible choice.
In the end, it was last summer’s heat dome that decided it for me. Gazpacho is a life-saver when the temperature hovers near 40ºC and as soon as I saw what was headed our way back in June, I whipped up a batch to sustain me through that crazy week.
Confession: the first time I was served gazpacho I really didn’t see what the big deal was. I was at a small dinner party here in Canada, and the host came out with a large bowl of finely chopped cucumbers, tomatoes, and peppers all mixed together. Gazpacho, she called it. And so, many years later when my sister and I were enjoying a round of tapas on our first night in Córdoba, I was taken aback when the gazpacho arrived.
“This is gazpacho?” I said to my sister, pointing to my glass. It was beyond delicious and a world apart from the cold, sad mixture of vegetables I’d been led to believe was gazpacho. But, in case you are confused, gazpacho is not merely a thick version of V8 juice. It’s so much more than that.
My sister laments that she can no longer buy gazpacho by the carton the way she could when she lived in Spain. She now satisfies her craving with this recipe, which she claims is the closest to the gazpacho she had in Spain. And since we were always served gazpacho in a glass in Spain, I serve it that way here in Canada. Yes, it’s soup, but it’s perfectly quaffable.
And it’s the best meal to have when you’re in the middle of a heat dome.
Gazpacho
3 pounds ripe tomatoes, cored and roughly chopped
1 small cucumber, peeled, seeded, and roughly chopped
1 medium green bell pepper, cored and roughly chopped
1 small red onion, minced
2 medium garlic cloves, minced
1 small serrano chili, seeded and minced
kosher salt
several slices day-old baguette
1/2 cup extra virgin olive oil
2 tablespoons sherry vinegar*
1. Place in a large bowl two-thirds of the tomatoes and half of the cucumber, bell pepper, and onion. Add the garlic, chili, and 1 1/2 teaspoons of the salt. Combine well and set aside.
2. Toss with 1/2 teaspoon of salt the remaining tomatoes, cucumber, pepper, and onion, and place in a fine mesh strainer over a medium bowl. Set aside for one hour, then transfer to the bowl with the rest of the vegetables.
3. Add the baguette slices to the liquid drained from the vegetables. Soak for one minute, then add the bread and any remaining liquid to the vegetables. Toss well to combine.
4. Transfer half of the mixture to a blender and process several minutes until completely smooth. With the blender running, slowly add 1/4 cup of extra virgin olive oil. Strain soup through a fine mesh strainer into a large bowl, then repeat with the remaining mixture and olive oil.**
5. Stir in the sherry vinegar and season to taste. Transfer to a pitcher, cover, and refrigerate overnight before serving.***
Notes:
*Use the best sherry vinegar you can find. I’ve learned that a poor-quality vinegar will make your gazpacho pretty much undrinkable.
**Some recipes call for setting aside some of the chopped vegetables to use as a garnish if you like. I don’t like, so never do.
***The flavours need time to blend, so don’t skimp on the waiting time. Several hours is the minimum.
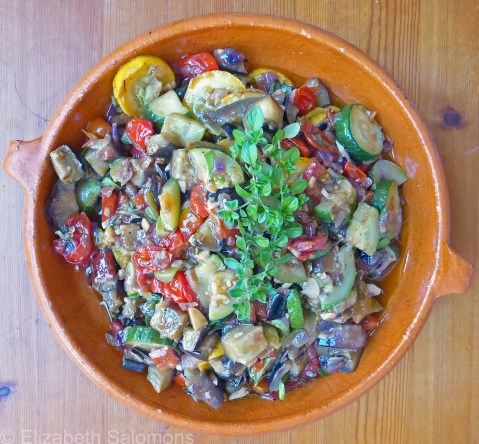
Recipe Box: Ratatouille
When I was flying back from New York the other month, I watched a couple of episodes of Anthony Bourdain’s show Parts Unknown on the plane, including the episode he shot in Newfoundland. (If you haven’t seen it, do. It’s hilarious and oh-so-Canadian.)
A world without Anthony Bourdain is all the poorer, I thought as I looked out my window somewhere over the American Midwest. The celebrity chef, travel writer, and TV personality died six months ago today. I had this sad anniversary in mind while working on my last post about Le Bernardin. Eric Ripert was a close friend of Anthony’s, and he appeared on his shows many, many times. They were together in France, filming an upcoming episode of Parts Unknown, when Anthony died.
The first Anthony Bourdain show I ever watched was an episode he filmed in Provence for No Reservations. My sister had recommended his show to me; I had never heard of the guy and had absolutely no expectations. But I went to YouTube, clicked on the episode — and have been a fan ever since.
One line of dialogue in the episode about Provence always stuck in my memory. Anthony was preparing a meal for his new Provençal friends and he was quite nervous about messing it up. He set his dish of ratatouille down in front of them, they tasted it, nodded politely, and then said, “It’s true that your ratatouille is very handsome.” After much laughter, Anthony asked what he got wrong. They replied, “You didn’t miss anything. It’s just … not a ratatouille.”
I remember laughing out loud at that point. Food is so much a part of the travel experience, and we try our best to replicate what we eat elsewhere when we are back home again, but most of the time we fail. It’s never quite the same. Rewatching the episode now, after the dozens of Anthony Bourdain TV shows I’ve watched since, I marvel at his self-awareness. It’s a rare quality that few celebrities (and, to be honest, men) possess.
A traditional dish from the south of France, ratatouille is essentially stewed vegetables. Like many French dishes, its origins are simple: it was a way for peasants to use what they had readily available in their gardens.
Last summer, I made a lot of ratatouille. It was a very good year for zucchini at my local farmers market and every weekend, I came home with bags of the stuff — all shapes and all sizes. And whenever I saw my sister, I was given bowls of tomatoes and handfuls of basil and thyme from her garden. What better dish to make than ratatouille when you have more fresh vegetables and herbs than you know what to do with?

This recipe is based on several versions, including Anthony’s. Vary the quantities according to your own preferences. I like to use cherry tomatoes, but if you use full-size tomatoes, you probably want to peel and seed them. If your squash are on the larger size, quarter the slices. Make sure your eggplant is on the smaller side as you want each cube to have a bit of the skin. And, most importantly, cook each vegetable separately to help retain their shape and texture.
I’m sure what follows is also “not a ratatouille,” but in my humble opinion it tasted all right.
Bon appétit!

Ratatouille
olive oil
1 medium red onion, diced
4 garlic cloves, peeled and chopped
1 1/2 cups cherry tomatoes, halved
1 medium eggplant, cubed
1 large red pepper, seeded and diced
2 medium zucchini, sliced
1 yellow zucchini, sliced
several sprigs fresh thyme
one handful fresh basil, shredded
2 teaspoons balsamic vinegar
salt and pepper
1. In a large, high-sided frying pan, heat several splashes of olive oil over medium to medium-high heat. Add the onion and garlic. Cook until soft, then remove from the pan and spread out on a cookie sheet to cool.
2. Wipe out the pan and repeat with the cherry tomatoes. When they are beginning to soften, smush them with the back of a wooden spoon to release their juices. Cook a little bit longer, then season with salt and pepper. Transfer them to the cookie sheet, keeping them separate from the onions and garlic.
3. Repeat with the remaining vegetables, wiping out the pan, seasoning with salt and pepper, and transferring to the cookie sheet each time.
4. When all the vegetables have cooled to room temperature, combine them in a large mixing bowl. Add the thyme, basil, and balsamic vinegar, and adjust seasoning if necessary. Let the mixture sit at room temperature for 3 or 4 hours before serving to let the flavours blend. Serve reheated or at room temperature.
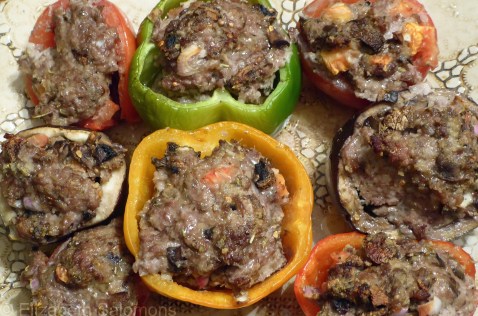
Recipe Box: Stuffed Provençal Vegetables
After cleaning up from our day of harvesting grapes, my friends and I met our hosts, Paul and Miriam, and our new German friends, Nils and Juliana, in the parking lot of the gîte. We got in our car and they got in Nils and Juliana’s car and off we drove to Jean-Louis’ place, which was just a short way down the road.
Jean-Louis introduced his wife (who worked in a bank and was dressed rather smartly), his mother-in-law (whom we had met earlier that day and whom we knew had been busy in the kitchen preparing our dinner), and his youngest daughter (whom I guessed to be about eight years old). After aperitifs were poured, we made ourselves comfortable in the large and spacious but homey living room.
The conversation that evening was mostly in French, with Jean-Louis’ wife and Paul as our main storytellers. Despite my limited French skills, I was able to follow along thanks to the animated way they both talked as well as Paul’s effort to speak slowly and carefully. It wasn’t long before we were invited to take our seats at the expansive wooden farm table in the next room.
I was seated next to the grandmother. As I was feeling the effects of the aperitif and also highly conscious of the fact that I was the only registered driver on our rental car (which I wasn’t 100% sure was properly insured, thanks to a communications snafu at the rental counter when we had picked up the car a week earlier), I came up with what I thought would be an ingenious way of managing my liquor intake for the rest of the evening: I would sip my wine very slowly.
But the grandmother was much too smart for me. When we were into our second course and she saw that I was still nursing my first glass of wine, she asked (in French) if I didn’t like the wine. I assured her (in French) that I thought the wine was excellent. I also realized that I needed to drink up to avoid offending my hosts. Which meant that, for the remainder of the evening, the minute my glass neared the halfway mark, the grandmother topped it up.
Dinner consisted of a simple green salad with olive oil to start, served with three types of bread. We were encouraged to wipe off our plates after every course with the bread, something I’ve noticed my French friends do automatically. The main course was zucchini, peppers, mushrooms, and tomatoes, all stuffed with a mixture of ground beef and herbs. A cheese course followed, more bread, coffee, then dessert, which consisted of fruit flans, one of which was quince, baked on cookie sheets. Brandy to finish off the evening. We ate until we could eat no more. Even Nils looked to be in pain when they tried to get him to take a third helping of the fruit flan.
The party finally broke up around midnight. As I rummaged around in my bag for the car keys, I told my friends I was slightly drunk, but thought I was OK to drive the short distance back to the gîte. However, no sooner had I poked the nose of the car into the road when one of my friends pointed out that another vehicle was approaching. I quickly reversed the car. “OK, maybe not so OK,” I muttered.
When I finally decided it was safe to pull into the road, I pointed the car in the direction we had to go. I drove very slowly and finally the gîte pulled into view. Paul and Miriam were waiting for us in the parking lot because they were worried we had gotten lost.
“That wasn’t the problem,” I said and I told them about my evening sitting beside the grandmother. And the next morning when we all said our good-byes, Nils apologized for feeling a bit hung over. He blamed the grandmother. “Oh, me too!” I said. “I had the exact same problem!”
I have tried several different recipes in an effort to replicate the stuffed vegetables we ate that night. With some tweaking, the following is the best I can come up with. It still doesn’t taste as good as I remember, but it’s a fair copy.
Bon appétit!
Stuffed Provençal Vegetables
1/4 cup bread crumbs or panko
1/4 cup milk
1 pound ground pork
1 pound ground beef
4 shallots, minced
2 cups mushrooms, diced
1 tablespoon Herbes de Provence
salt and pepper
2 red peppers
2 orange peppers
2 green peppers
1 eggplant
4 medium tomatoes
1. Preheat oven to 350°F.
2. Pour the milk over the bread crumbs or panko and set aside.
3. Cut the tops off the peppers and tomatoes and remove the seeds. Cut the eggplant in half lengthwise and scoop out the flesh. Alternatively, cut the eggplant horizontally into thirds and scoop out the flesh, making sure you don’t scoop all the way through so that you leave a base for each piece of eggplant. Arrange the vegetables in a baking pan.
4. Combine the pork, beef, shallots, mushrooms, Herbes de Provence, salt, pepper, and moistened bread crumbs or panko. Mix to combine.
5. Fill each vegetable with a generous amount of the meat mixture. (The meat will shrink as it cooks.)
6. Bake for about 1 hour or until meat is cooked through and vegetables are soft.
Note: The tricky part to this recipe is that the different vegetables vary in how quickly they will cook. The tomatoes need the least amount of time, while the eggplant needs the most. Other vegetables that could be stuffed include zucchini or large mushrooms.
Armchair Traveller: The Sharper Your Knife, The Less You Cry

Several years ago, a friend gave me a copy of Kathleen Flinn’s The Sharper Your Knife, The Less You Cry as a Christmas present. She said she knew I would like it.
She was right. I devoured the book.
I picked it up again last month when I was writing my post about the film Julie and Julia. I flipped through it, rereading bits here and there, but was stopped cold by this sentence near the beginning of the book:
With that, I lost a job I was desperate to quit.
I immediately sat down and began to reread the book from start to finish.
Kathleen Flinn wrote The Sharper Your Knife, The Less You Cry after graduating from Le Cordon Bleu in 2005. A journalist by trade, she based her account on the journal entries she wrote during her time in Paris, the audio tapes she recorded during demonstration classes, and the interviews she conducted with students, school staff, and alumni. The result is a highly entertaining and enlightening account of one American student’s experiences while studying at one of the top culinary schools on the planet.
Studying at Le Cordon Bleu is not for the faint of heart. The curriculum is daunting, the expectations are high, and the classes are taught in French. Flinn completed the three-part Diplôme de Cuisine (Cuisine Diploma); each part (Basic Cuisine, Intermediate Cuisine, and Superior Cuisine) is three months long. One can also study pastry and complete a three-part Diplôme de Pâtisserie, or do both cuisine and pastry, and receive Le Grand Diplôme.
The binder of more than a hundred recipes each student is given at the beginning of the course contains only lists of ingredients. Students are expected to make notes during the demonstration class, then repeat the recipe ― exactly ― during their practical class. Like I said, not for the faint of heart. When Flinn explains to the chef she has never filleted a fish before in her life, he replies, “I can tell. You should practice ― at home.” Another chef yells at her after a particularly trying class, “Vous perdez votre temps!” (You are wasting your time.)
I learned some interesting bits of trivia while reading this book. For instance, did you know that quiche comes from the German word for “cake”? Or that the sharper your knife when you dice onions, the less likely you are to cry? (Cue the book’s title.) Provençal cuisine ― with its olives, olive oil, tomatoes, and saffron ― has its origins from the time of the Romans, who occupied the region and named it Nostra Provincia (our province).
Back to the beginning: Flinn lost her job and enrolled in Le Cordon Bleu (using up all her savings to do so) with the encouragement of her then-boyfriend (now husband) who remembered it was something she had always said she wanted to do. When she protests that she knows no one in Paris, he merely says, “You’ll know me. If you want me to, I’ll go with you.”
(Sigh. Not only is this book a food/travel memoir, but it’s a love story as well.)
“Living is like driving. You have to pick a lane,” Flinn’s grandmother used to tell her. At the start of Basic Cuisine, Flinn wonders if she picked the right lane, but by the end of this book, you know she has. The chef who told her she was wasting her time becomes her greatest mentor and she thanks him, in the end, for being so tough on her. She was already an accomplished food journalist before studying at Le Cordon Bleu; her culinary studies only cemented that career and proved to her she had found her bliss.
So why did the sentence I read earlier this summer (“With that, I lost a job I was desperate to quit”) make me drop everything and reread this book in pretty much one sitting?
It’s because earlier this summer I found out I was going to lose my job ― a job I didn’t know I was desperate to quit until I lost it. This past winter I was sinking deeper and deeper into a funk about what to do about this job I thought I wanted, and the only thing that was giving me any enjoyment was cooking.
Yup. I’ve been spending my weekends recuperating from my day job by hunkering down in my tiny condo-sized kitchen. Sadly, the most appealing aspect of all this cooking was that I was alone. Somewhere around Easter I realized I needed to avoid all contact with people on weekends, for the simple reason that when you’re an introvert, and you work in a small, high-energy office, it takes you two days minimum to recover before you are ready for Monday morning. Obviously, that’s not a tenable situation if you want to have any kind of social life.
Yesterday was my last day at work. I don’t exactly know what I will be doing next, although I’m pretty sure I won’t be running off to Paris to go to cooking school anytime soon. But this much I do know: there will be a lot more writing and travelling in my future.
And probably some cooking, too.
If you’re even minimally interested in cooking, I recommend you read The Sharper Your Knife, the Less You Cry. (Yes, there are recipes, too.) And if you’re at a crossroads in your life and are wondering what lane to choose next, I highly recommend you read it.
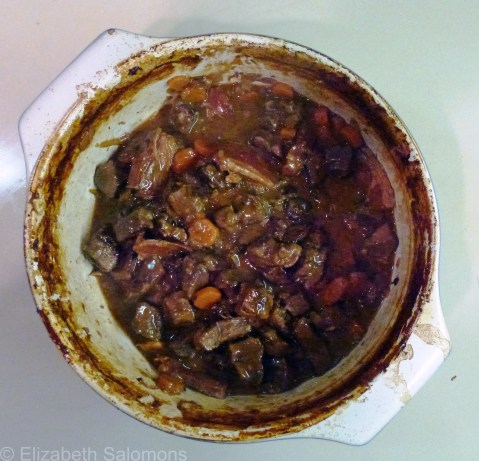
Recipe Box: Boeuf Bourguignon
Before we get too far into spring, I need to fill you in on how I spent my non-winter.
(Because when one hasn’t the means for a mid-winter getaway, and there’s no snow to play in, how does one entertain oneself in Vancouver through a long non-winter that is most definitely not summer?)
Me? I entertain myself by taking French cooking classes. That way I enjoy some armchair travel (is it still considered “armchair” when you are run off your feet for three hours?) and learn something new about France.
This winter I chose a class focused on the food of Burgundy, and one of the dishes on the course syllabus was boeuf bourguignon.
Confession: I’ve never actually eaten boeuf bourguignon in France, but a friend made it for a dinner party she hosted in my honour before I headed off to spend the winter in Paris some years ago. It was my first encounter with the braised stew and it was delicious.
Like coq au vin, boeuf bourguignon is a former peasant dish that has made its way into fine dining; cheap (read: tough) cuts of meat are softened to a delicate texture by stewing them in wine.
The classic wine choice for making boeuf bourguignon is Pinot Noir, given that the prevalent grape grown in Burgundy is Pinot noir. My French cooking instructor provided us with BC Pinot to make our stew ― French wine was too dear for his budget. To speed up the cooking time, he had us cut the beef into smaller cubes, and cook the stew on the stove instead of in the oven.
Bon appétit!
Boeuf Bourguignon
3 pounds stewing beef cut into 2-inch cubes
4 garlic cloves, peeled and cut in half
2 bay leaves
2 sprigs fresh parsley
2 springs fresh thyme
2 sprigs fresh rosemary
2 carrots
2 onions
1 bottle Pinot Noir
6 ounces bacon cut into lardons (1/4 inch wide and 1 1/2 inches long)
1 tablespoon olive oil
1 teaspoon salt
1/4 teaspoon pepper
2 tablespoons flour
2 to 3 cups brown beef stock
1 tablespoon tomato paste
2 cloves mashed garlic
1/2 teaspoon thyme
1 crumpled bay leaf
2 tablespoons chopped parsley
brown-braised onions (see below)
sautéed mushrooms (see below)

1. Peel 1 carrot and cut into sticks. Peel 1 onion and cut into quarters.
2. Place the beef in a large non-reactive bowl. Add the carrot, onion, garlic, bay leaves, parsley, thyme, rosemary, and wine. Marinade overnight. (Note: In my humble opinion, marinating the meat is optional. My French cooking instructor taught us to do it, but Julia Child doesn’t bother with this step.)
3. Preheat oven to 450°F.
4. In a large sauce pan, Dutch oven, or cocotte, brown the lardons in butter. Remove from pan.
5. Strain the beef and vegetables, reserving the marinade, then dry the beef cubes with paper towels.
6. Reheat the bacon fat until it is almost smoking, then brown the beef in the fat. (Note: My French cooking instructor tried to get me to stir the beef by shaking the pan with a forward motion to flip the cubes from back to front. It was a heavy pan. But if you can manage it, go for it. It will make you feel like a real chef.)
7. Remove the beef from pan and add it to the bacon.
8. Peel and slice the remaining carrot and onion. Brown them in the bacon fat, then pour out the fat.
9. Return the beef and bacon to the pan and sprinkle with the salt and pepper and flour to coat lightly.
10. Put the uncovered pan in the preheated oven for four minutes. Toss the meat, then return to oven for another four minutes. (This step cooks the flour and gives the beef a light crust. Do not skip.)
11. Remove the beef from the oven and turn the oven down to 325°F.
12. Stir in the reserved marinade (or bottle of Pinot Noir if you didn’t marinate the beef), and enough stock to just cover the meat.
13. Add the tomato paste, mashed garlic, and herbs.
14. Bring to a simmer on top of the stove, then cover and return to oven.
15. Braise the beef for 2 1/2 to 3 hours, checking to ensure the liquid is gently simmering. When the beef is tender, remove from the oven.
16. While the beef is in the oven, prepare the onions and mushrooms (see below).
17. Strain the beef from the liquid.
18. Skim any fat from the liquid remaining in the pan, and simmer for a minute or two. Bring to a boil and reduce to 2 1/4 cups. To thicken, it may be necessary to add beurre manié ― a paste made of equal parts butter and flour. Use a whisk to mix the beurre manié into the liquid.
19. Return to heat and simmer for a few minutes until sauce has thickened, then remove from heat.
20. Return the beef to the sauce to reheat. The onions and mushrooms can be added to the sauce or served on the side. Sprinkle chopped parsley over top and serve with oven-roasted or boiled new potatoes.
Brown-braised Onions
12 to 18 white onions about 1 inch in diameter, or 24 pearl onions
1 1/2 tablespoons butter
1 1/2 tablespoons oil
1/2 cup stock, dry white wine, red wine, or water
salt and pepper
one herb bouquet (4 parsley springs, 1 bay leaf, and 1/4 teaspoon thyme tied in cheesecloth)
1. Bring a pot of water to boil, immerse the onions for about a minute, drain, then cut off the root and peel.
2. Place a skillet over high heat with the butter and oil. When hot, turn the heat down to moderate and brown the onions.
3. Add the liquid, salt and pepper, and the herb bouquet.
4. Cover and simmer slowly for 40 to 50 minutes until the onions are tender and the liquid has evaporated. The onions should retain their shape. Remove the herb bouquet.

Sautéed Mushrooms
2 tablespoons butter
1 tablespoon oil
1/2 pound fresh mushrooms (cut into quarters if large)
1 to 2 tablespoons minced shallots or green onions (optional)
salt and pepper
1. Place a skillet over high heat with the butter and oil. When hot, turn the heat down to moderate and add the mushrooms. Remove from heat as soon as mushrooms are lightly browned.
2. If using shallots or green onions, add to the mushrooms, and sauté over moderate heat for 2 more minutes.

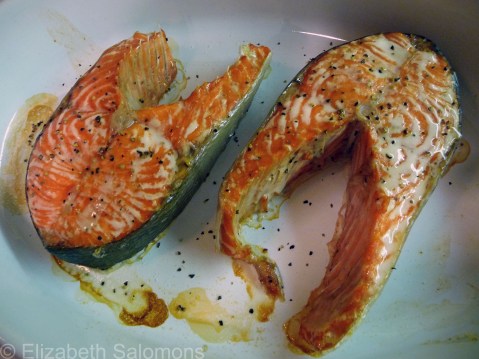
Recipe Box: Sockeye Salmon
A sure sign that summer is morphing into fall is when the salmon start running.
Four years ago, the Fraser River had the salmon run of the century. More than 30 million sockeye swam up river to spawn that year ― the highest number since 1913. This year, their offspring are returning to spawn in spades, and both the commercial and sports fisheries are expected to match their harvest of 2010. (Time for a quick biology lesson ― just in case it’s needed. Salmon are born in freshwater rivers, migrate to the ocean, then return to the rivers to spawn. They always return to the river where they were born; thus, it can be predicted that a good salmon run one year will result in another good run several years later.)

Now, if you live along the West Coast (as I do), you have the good fortune to be able to buy sockeye right off the boat (as they say). I bought a nice four-pounder last weekend. (I asked for the smallest one they had ― most were much bigger.) This year the sockeye are so prolific that the fishmonger up the street is matching the price I paid at the dock, and even my local big-chain grocery store is stocking whole salmon.

What to do with a whole salmon, you ask? Why, you fillet it. Or you cut it into steaks. (Trust me: YouTube is your friend on days like these.)
And then you grill it, bake it, pan fry it … the options are myriad.
I’ve tried all kinds of recipes, but my favourite way to prepare sockeye salmon is to keep it simple: season with salt and pepper, then pop it into a preheated 450°F oven. Bake for about 12 minutes, no longer. The key when cooking salmon in the oven is to not overbake it or it will be too dry.
And then: enjoy!
Armchair Traveller: On Rue Tatin
 How many shopping days until Christmas? I think I have time to squeeze in another book recommendation.
This one is by another American cookbook author who transplants herself to France, but she doesn’t write about cooking in the World’s Most Glorious ― and Perplexing ― City. Instead, she and her family live (and cook and eat) in a small village in Normandy.
On Rue Tatin by Susan Herrmann Loomis is part travel memoir, part cookbook. There is one long tedious chapter to get through that describes her history with France and how she and her husband came to live in Normandy, but after that the book picks up its pace. Many pages are devoted to their struggles (and expenses) of renovating the house they bought beside the Romanesque/Gothic village church into a family home. The building was a convent for three hundred years, then an antique shop; I dread to think of what it looked like when she first set foot inside. It is in this convent-turned-home that she also teaches week-long classes at her cooking school, also named On Rue Tatin.
Although the first chapter of On Rue Tatin almost made me put the book down (what was her editor thinking?), Normandy is an underrated region of France and for that reason alone I recommend giving the book a read. I also have to ’fess up that Loomis’s assessment of the amount of rain Normandy is known for made me laugh: as a former Seattleite, she assured her readers it was nothing. That was enough to convince me that I would feel right at home in Normandy. And her recipes are enticing enough that I have already decided my next cooking class will be on Norman cuisine (here in Vancouver, alas, not in Normandy). But I can already smell the tarte tatin I will be baking.
Armchair Traveller: The Sweet Life in Paris
 Are you still searching for the perfect Christmas gift for the armchair traveller in your life? Perhaps you could use a suggestion for your own holiday reading. Either way, here’s a book recommendation for you: The Sweet Life in Paris by David Lebovitz.
I discovered David Lebovitz’s writing through his blog called, appropriately enough, Living the Sweet Life in Paris. But even if I had never heard of the guy (or his blog), I would have grabbed the book off the store shelf on the merit of its subtitle alone: Delicious Adventures in the World’s Most Glorious ― and Perplexing ― City.
David Lebovitz is a San-Francisco-pastry-chef-turned-cookbook-writer who starts life over in Paris following the unexpected death of his long-time partner ― a move he describes as “an opportunity to flip over the Etch A Sketch” of his life. Once in Paris, his writing shifts and his books expand from simply recipes to an examination ― centred around food, of course ― of all the ups and downs of living in Paris.
The Sweet Life in Paris is the result. It’s a book of short essays about daily life in Paris, followed by an appropriate recipe. Some of the links are tenuous, like when Lebovitz follows a description of French plumbing woes with a recipe for a meringue dessert called Floating Island. (The connection between the two? He recommends not flushing the meringue down the toilet if it doesn’t turn out.) Others are bang on, like his recipes for Chocolate Mousse that accompany the story of how he discovered the secret to dealing with French bureaucrats is to bribe them with free copies of his cookbooks.
Lebovitz’s credibility shot up when I read his recommendation that, if you don’t like anchovies, be sure to try them fresh in Collioure on the Mediterranean coast. I’ve eaten fresh anchovies in Collioure ― they would convert any non-believer.
But while Lebovitz’s descriptions of food in The Sweet Life in Paris are mouth-watering, as are his recipes, what I appreciate most about this book is his ability to see the funny in the incredibly frustrating idiosyncrasies of Parisian life. I’m with him 100% as he puzzles over why European washing machines take two hours to wash a load of laundry that would take North American machines a mere 40 minutes. Most of all, I wish I’d known his system for navigating the aisles of a Parisian supermarket before I spent a winter in Paris:
I hold [my basket] in front of me as I walk, like the prow of a battleship, to clear the way. That doesn’t always work, as Parisians don’t like to move or back up for anyone, no matter what. So sometimes I hide my basket behind me, then heave it forward at the last moment; the element of surprise gives them no time to plan a counteroffensive, and when the coast is suddenly clear, I made a break for it.
I lost count of how many times I had to sidestep, trip over, or squeeze past Parisians who refused to budge an inch in the narrow aisles of Monoprix or Carrefour. Now I can’t wait to go back and try out Lebovitz’s technique.
Even if you’ve never been to Paris and don’t know the difference between a pastry brush and a pastry blender, pick up a copy of The Sweet Life in Paris. It’s good for the laughs.
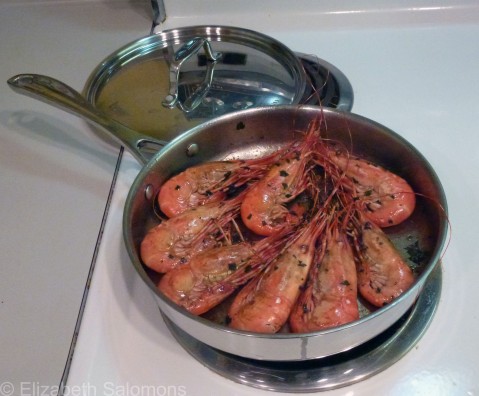
Recipe Box: Wild BC Spot Prawns

I first discovered wild BC spot prawns a couple of years ago when I noticed them popping up on restaurant menus around town.
“Spot prawns? What are spot prawns?” I asked my friends. They didn’t know either. I ordered them, tasted them, fell in love with them …
With a little research, I discovered that the wild BC spot prawn is the largest of seven species of commercially available BC shrimp. What’s unique about them is their distinctive white spots and naturally bright orange colour.
With a little more research, I learned that the spot prawn fishery is one of BC’s most sustainable fisheries. It’s limited to trap gear only, and the prawns are hand sorted upon removal from the ocean. Prawns too small for consumption are thrown back. About 90 percent of the commercial catch is shipped to Japan and the remainder is sold locally. But here’s the kicker: the season is short ― only six weeks from mid-May to June. In other words: get them while you can. (And if you don’t live in BC or Japan, well, too bad for you.)
Last year, I got up the courage to cook spot prawns myself. I had house guests ― my brother and his family were visiting from land-locked Alberta ― and when they told me they wanted to spend the day playing tourist at Granville Island, I decided to show off. I told them, casual like (as if I did it all the time), that I would pick up some spot prawns at the market for our dinner.
I was a bit taken aback when the fishmonger scooped a handful of live spot prawns from a water tank. “I didn’t know they were sold live,” I whispered to my brother, my bravado quickly disappearing. Gamely, I accepted the plastic bag of prawns wrapped in newspaper. I told the fishmonger I was planning to sauté them with garlic in butter.
“Excellent,” he said. “That’s the best way to prepare them.”
“But … do I have to … you know … kill them first?” I asked gingerly.
“Nope,” he said. “By the time you get them home, they’ll be dead.” Phew. I’m no vegetarian, but I draw the line at killing my own food.
He was right. When I unwrapped my package a few hours later, the shrimp were still bright orange, but most definitely in a non-living state. I cooked them up, and we devoured those garlicky spot prawns in record time. Their taste reminded me of lobster, and my only regret was that I didn’t buy more.
This year, I did buy more, and I cooked them the same way, relishing them as much as the first time. The very next evening, I went to my sister’s and her husband’s for a barbecue dinner, and was pleased to find out that grilled spot prawns were on the menu. But I was stunned when I saw the plate of prawns she had prepared for grilling.
“Where are the heads!?” I asked.
My sister looked at me, puzzled. “You have to take them off,” she insisted.
Lively debate ensues: do you eat spot prawns with the heads on or off? (And, while we’re at it, do you need to devein them?)
Back to Google. It turns out that deveining spot prawns is a matter of personal preference. (I have yet to taste the grittiness some claim is common if you don’t devein.) But what is critical is that you remove the heads immediately if you aren’t intending to cook the prawns the same day, because they release an enzyme after death that makes the tail meat turn mushy.
Here is the recipe I like to use (with heads on), but know that if you eat yours with heads off, they will be just as tasty.
Enjoy!
Wild BC Spot Prawns
1 pound whole spot prawns
2 tablespoons butter
2 cloves minced garlic
1 tablespoon chopped parsley
1/4 cup dry white wine
salt and pepper to taste
1. Melt butter in a large frying pan on medium high heat.
2. Add minced garlic and parsley and sauté for 1 to 2 minutes.
3. Add prawns and white wine, tossing to coat with the butter and parsley, then season with salt and pepper.
4. Cover and cook 4 to 5 minutes, no longer.
Serve with slices of crusty baguette and a chilled buttery chardonnay.

Recipe Box: Bitterballen
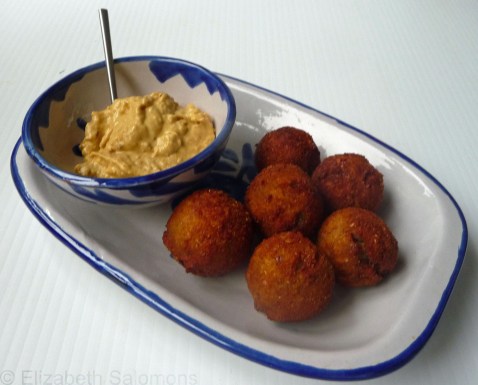
Every year around the holiday season, my mother used to make bitterballen. These little morsels are a savoury Dutch meat snack that (in our household at least) disappeared faster than Mom could make them.
In the Netherlands, bitterballen are served as bar snacks alongside alcohol. (A direct translation of bitterballen would be “balls to eat with bitters.”) I’ve had tapas in Spain that look exactly like bitterballen but are made with fish. (Which makes me wonder if the Spanish introduced the snack to the Low Countries. You know, back when they were the boss of them between the sixteenth and eighteenth centuries?)
Another version of the same Dutch snack in cylinder form are called kroketten (croquettes). These you can buy for a couple of euros in vending machines all over the Netherlands. You can imagine our delight when my brother and sisters and I saw kroketten so readily available on our first ever trip to Holland as kids. Christmas treats in a vending machine!?! How cool was that?
There’s a story behind the first time I made bitterballen myself. I was going to a party hosted by an Italian-Canadian friend of mine where there would be many other Italian-Canadians, and I wanted to bring something special. Now, I have to confess that, as a child of Dutch immigrants, I didn’t always like identifying myself as Dutch-Canadian. I would firmly tell my mother when she insisted I was Dutch that I was not. I was just a plain Canadian. No hyphens, please.
But back to the party. Hanging out with my Italian-Canadian friends had shown me a group of Canadians who completely and firmly embraced their heritage in a way that I had not been comfortable doing. Following their example, I decided it was time for me to embrace my heritage. And so, I brought a plate of bitterballen to the party and proudly placed them on the table beside the cannelloni and tiramisu.
The bitterballen were a hit and I’ve made them every Christmas since, sharing them with my friends of all ethnic origins. I find it ironic that it took a bunch of Italian-Canadians to help me appreciate my Dutchness, but there it is. I’m grateful to them for it.
Eet smakelijk!
Bitterballen
2 tablespoons butter
1 small onion, chopped
3 tablespoons flour
1 cup milk
1 tablespoon dried parsley
1 teaspoon salt
1 teaspoon Worcestershire sauce
1/4 teaspoon curry powder
2 cups ground cooked meat*
1 1/2 cups grated Gouda cheese**
2 eggs***
2 tablespoons water
1 1/2 cups bread crumbs
vegetable oil
1. Melt butter in a saucepan.
2. Sauté onion in the butter until soft.
3. Add flour, blend well, and cook for 1 minute.
4. Slowly add the milk. Cook until thickened, stirring constantly.
5. Add parsley, salt, Worcestershire sauce, curry powder, cooked meat, and cheese. Cook for another 5 minutes, then allow mixture to cool.
6. Mix the eggs and water together in a small bowl, and pour the bread crumbs into a second small bowl.
7. Shape the cooled meat mixture into small bite-sized balls about an inch in diameter.
8. Roll the balls in bread crumbs, the egg-and-water mixture, and bread crumbs again. (If you intend to freeze them, use three coats of bread crumbs.) Chill balls for at least an hour.
9. Heat the vegetable oil in a small sauce pan, then fry the bitterballen until golden brown (about 2 minutes). Drain on paper towels, and serve with your favourite mustard for dipping.
Notes:
*Ground roast beef is traditional, but use whatever type of meat or seafood you fancy. My mother used ground beef because there was rarely leftover roast beef in our home, and I do the same.
**Mom didn’t add Gouda cheese, but the recipe I use does and I like the flavour. The cheese also gives the meat mixture a firmer consistency for rolling.
***I find I usually need more than 2 eggs. Simply add another egg and tablespoon of water to the bowl as needed.
